
Coilover shocks come in many different brands, sizes and configurations, however, the setup and installation is the same for all coilovers and this guide will walk you through that process.
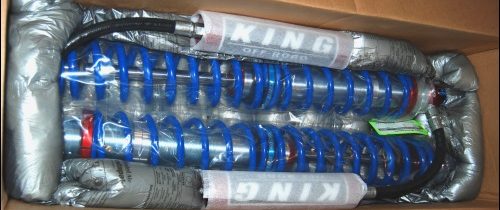
Upon receiving your coilovers, the first thing you should do is inspect them carefully, make sure they are the correct size, and if needed, verify which set is for the front of the vehicle and which ones are for the rear. King includes shock specifications on green tags attached to each shock.
Step 1: Install the Springs and Set Preload
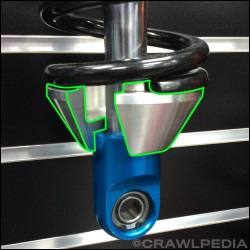 If your coilovers are delivered without springs installed, the first step is to add them. To do this, start by fully extending the shock by pulling on the shaft by hand. Then, if the lower spring plate came installed on the lower rod end, remove it by lifting it up and sliding it out through the slot over the shaft. (Some shocks use other spring plate designs, but sliding them up will always reveal the locking mechanism.)
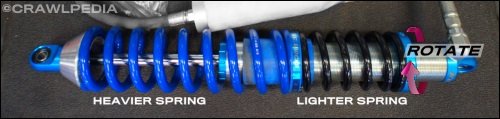
Install the first spring by sliding it up the shaft until it contacts the upper spring retainer (coil adjustment / pre-load nut). Remember, the lighter rate spring always goes on first. For dual rate coilovers, the next item to go on is the slider followed by the lower spring. Triple rate coilovers will have the tender spring already installed at the top as that goes on during the assembly process to put it above the stop nuts.
Finally, install the lower spring plate by sliding it through the shock shaft and down onto the lower rod end. Some coilover brands use slightly different designs but this is the most common.
For more information on calculating your spring rates see our Spring Rate Calculator and Spring Re-Calculation Guide.
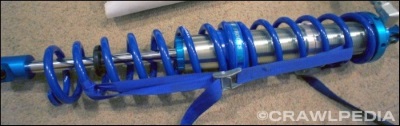
If the lower spring plate won’t fit onto the shaft, make sure that the upper coil adjuster nut has been rotated all the way to the top of the shock and try again. If after that the lower spring plate still doesn’t fit, you may need to preload the springs slightly to give yourself room. For lighter springs, this can be done with tie down straps and heavier springs will require a coil spring compressor. You should never need to preload your springs more than a couple inches so if you do, chances are your springs are too tall.
With the lower spring plate installed, rotate your upper spring retainer (coil adjustment nut) down by hand until the springs are snug together and then double check to make sure that the lower spring plate is properly settled on the lower rod end. This position will be your zero-preload position and it should never be adjusted any higher than this so we recommend making a mark on the threads here for reference. If the coil adjustment nut has a locking screw, it is important to tighten it down after any changes.
Define Pre-Load: Pre-Load is how much the springs have been pre-loaded with zero pre-load being the point at which the springs, slider, spring plate, and coil nut adjsuters are touching with no play. The amount of threads showing above the coil nut adjuster is NOT that same as pre-load.
Step 2: Install the Coilovers and Check Your Springs
Safety First! Installing coilovers on the vehicle for the first time can be dangerous so be careful! This will require lifting the vehicle high up where it will be unstable and this will also be the first time that your upper and lower coilover mounts will be tested under the full weight of the vehicle so make sure to support the vehicle with jack stands, wear eye and ear protection, go slowly, be vigilant, and use common sense. If you have any hesitations at all, have a professional help you with this process. Finally, make sure to only use grade 8 or higher bolts, lock washers, and nuts.
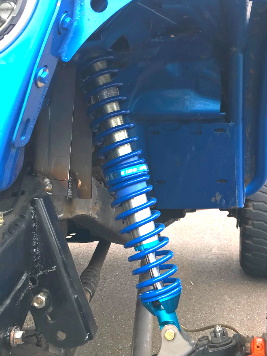
With the vehicle chassis suspended and the suspension in full droop, install the coilovers using grade 8 bolts, lock washers, and nuts. Check for clearances around the coilovers and then, very slowly, start lowering the weight of the vehicle down onto them.
 Hopefully, once the weight of the vehicle is entirely resting on the coilovers, it is settled at or slightly below your desired ride height. If not, then you will need to make one of the following spring and/or pre-load adjustments:
A. Vehicle Sits 1 to 3 Inches Below Ride Height:
If, under the full weight of the vehicle, your springs settle 1 to 3 inches below the desired ride height, then you will simply need to add that amount of pre-load to your coilovers.
B. Vehicle Sits More than 3 Inches Below Ride Height:
If the coilovers settle more than 3 inches below your desired ride height, or are fully collapsed, then you will need to change your springs. Please see our Coilover Spring Re-Calculation Guide to find the proper spring rates based on calculations from your existing springs.
C. Vehicle Sits Above Ride Height:
If, under its own weight, the vehicle sits above your desired ride height, then you will need to change your springs. See our Coilover Spring Re-Calculation Guide to find the proper spring rates based on calculations from your existing springs.
Important Tips: New shocks have very tight seals that will cause the coilovers to “stick” in different positions. This goes away when the shocks are warmed up so be sure to make your final changes during your first testing session. It is also normal for coilovers to require different amounts of pre-load on each corner due to different corner weights. Finally, remember that adding people, gear, and fuel will cause the coilovers to settle a bit more so take that into account during your pre-load adjustments.
How to Add Pre-Load on a Coilover
 To add pre-load to your coilover springs, remove all weight from the springs by lifting the vehicle’s chassis and letting the suspension droop out fully. Then, using a coil nut adjusting tool (we like to use a screwdriver with a nice handle that we have cut down), rotate the upper coil adjustment nut down the desired distance. If the coil adjustment nut uses a locking screw, make sure to loosen it before making an adjustment and then tighten it down when you are done. Finally, with the preload adjustments made, slowly release the vehicle weight down onto the coilovers again. Hopefully, the vehicle is now settled at your desired ride height. If not, follow the above steps again as needed.
Important Note: Never adjust your pre-load with the weight of the vehicle on the coilovers, this can damage the coilover cylinder and/or the coil nut, both of which are expensive and hard to replace.
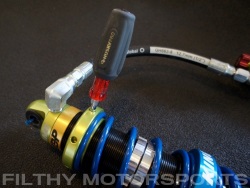
Pressurize the Coilovers to 150 PSI
If your coilovers shipped uncharged (collapsed), or if you discharged them to make the installation process easier, now is the time to pressure the shock body or shock reservoir with nitrogen. While different brands of performance shocks and coilovers have recommended pressures of 100 to 250 PSI, we find that 150PSI is a great place to start across the board.
Use Nitrogen, Not Compressed Air The most common question we get about charging shocks is if it is okay to use shop air instead of Nitrogen. While compressed air will effectively pressurize the shock, it will also introduce moisture and other chemicals in the air into the shock which is bad for many reasons. Nitrogen holds constant pressure much better and is less affected by increases in shock temperature.
Nitrogen tanks and regulators can be rented or purchased from your local welding supply shop.
Step 3: Initial Test Run
With the coilovers mounted on the vehicle and the proper springs and pre-load set, it is time to go for an initial test run. While this guide does not cover shock valving or shock tuning, the initial test run will give you an initial feel for both. Ultimately, as far as your springs are concerned, you simply need them to be as light as possible, yet strong enough for them to support the vehicle without requiring excessive pre-load, so if you followed the above instructions, you are all set.
Important Note: Coilovers should not be used to fix body lean or sway. If the vehicle has excessive body roll during testing, you will either need to add a sway bar or adjust your suspension geometry and coilover positions (or both).
Step 4: Set Your Stop Nuts
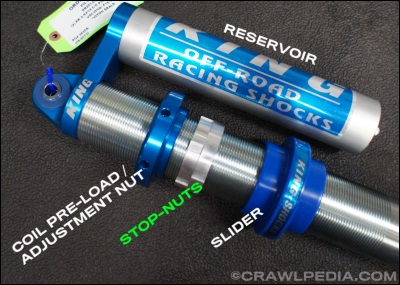 On dual rate and triple rate coilovers, the last thing you will need to adjust are your stop nuts. The stop nuts are threaded onto the cylinder below the coil adjustment nut and are used to set the transition point between the softer upper spring and stiffer lower spring.
For most applications, the stop nuts should be positioned about 2 to 3 inches above the slider (spring separator) when the vehicle is at ride height. This means that the first 2 to 3 inches of up travel will be on the softer upper spring and after that it will transition to the stiffer bottom spring.
To move the stop nuts, use a flat screwdriver and a hammer to knock the upper nut up (spin to the right) and the lower nut down (spin to the left), some coilover brands use a rubber o-ring between the stop nuts to lock them in place so make sure not to damage it. Spin the stop nuts to their new position and then tighten them against each other and give them each a moderate tap with the screwdriver and hammer.
Fine Tuning
Now that your coilover springs are set up correctly, it’s time to do more testing and tuning. If you’ve followed the instructions above, then your spring rates are correct, and any changes moving forward should be small and incremental. The following is a quick list of adjustment you may need to make:
- Add or remove pre-load to change your ride height. Never go above your zero preload point and never go beyond 4″ of preload.
- Adjust your stop nuts to change where your spring rate transitions from the softer upper spring to the stiffer lower spring.
- Change the difference in spring rate between your upper and lower springs to increase or decrease your transition effect.
Other Coilover and Spring Resources
Crawlpedia Shock Shootout
How To Measure For Coilovers
Coilover Spring Re-Calculation Guide
Coilover Spring Rate Calculator
ORI STX Struts Guide Hydraulic Bump Stop Guide
Performance Shock Tuning Guide
Source- http://www.crawlpedia.com/coilover_setup.htm